EV Charging Cable Organization and Cable Management Solutions for Home Garages
There’s a specific kind of quiet satisfaction when you pull into your garage after a long day, plug in your EV, and the little light on the charger blinks to life. But then, you look down. The cable—that thick, snake-like 20-footer—is coiled in a heap on the concrete floor. It’s dusty, slightly tangled, and honestly, it’s a tripping hazard waiting to happen. You tell yourself you’ll deal with it later. But later never comes.
If that sounds familiar, you’re not alone. Cable clutter is the ugly side of EV ownership that nobody talks about at the dealership. The good news? You don’t need a full garage renovation to fix it. A few smart choices—and maybe a little DIY grit—can turn that chaotic mess into a tidy, functional setup. Let’s dig into the best ways to tame the beast.
Why Cable Management Matters More Than You Think
Sure, a tangled cable looks bad. But it’s not just about aesthetics. Constant dragging across a rough concrete floor wears down the outer jacket. That protective layer is what keeps moisture and debris away from the live wires inside. Once it’s compromised, you’re looking at potential short circuits or, worse, a fire risk. Yeah, let that sink in.
Also, consider the daily friction. If you’re wrestling with a knot every morning, you’re more likely to rush the plug-in process. That’s how connectors get bent or pins get damaged. A proper cable management system protects your investment—both the car and the charger.
And then there’s the simple joy of walking into a clean garage. It sets the tone for the whole day. Trust me, it’s worth the twenty minutes of effort.
First, Assess Your Garage Setup
Before you buy anything, take a hard look at your space. Is your charger mounted on the wall right next to the car’s port? Or is it dangling from a ceiling beam? The distance between the charger and your vehicle’s inlet determines how much cable you’re dealing with.
Most home chargers come with a 20 to 25-foot cable. That’s plenty for a typical two-car garage. But here’s the thing—you rarely need all of that length. The excess is what creates the mess. So, your goal is to manage the slack, not the whole cable.
Also, think about your habits. Do you park the same way every day? Is the charger on the left or right side of the car? These little details matter. A solution that works for a front-port EV might be awkward for a rear-port truck.
The Classic Wall-Mounted Holster
Let’s start with the simplest option. A wall-mounted holster or dock is basically a cradle for your charging handle. You plug the connector in, and the weight of the handle holds the cable in place. Most of them come with a built-in hook or slot to wrap the cable around.
These are cheap—like, $20 to $40 cheap—and they install in five minutes with two screws. The downside? You still have to manually coil the cable. If you’re someone who hates winding extension cords, this might feel like a chore. But honestly, it’s the most reliable method out there. No moving parts, no batteries, no fuss.
Pro tip: Mount the holster at shoulder height, not eye level. You want the cable to drape naturally without kinking. And leave a little slack at the bottom for the loop—don’t pull it taut.
Spring-Loaded Retractable Reels
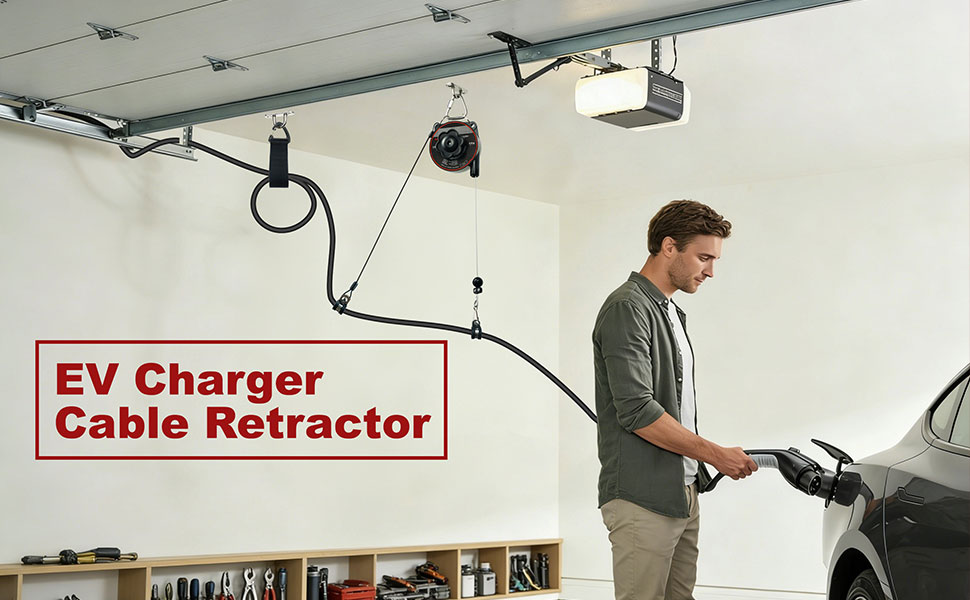
If you’re tired of manual coiling, a retractable reel is your best friend. Think of it like a heavy-duty vacuum cord system, but for your EV. You pull out the length you need, plug in, and when you’re done, a gentle tug releases the lock and the reel sucks the cable back up.
These are usually mounted on the ceiling or high on the wall. The cable hangs down vertically, which keeps it completely off the floor. It’s a slick solution, especially for tight garages where floor space is precious.
One caveat: quality matters. Cheap reels can jam or lose tension over time. Look for one rated for at least 25 feet and heavy-gauge cable. Expect to spend $100 to $200. It’s more than a holster, but the convenience is worth it.
Overhead Cable Tracks and Festoon Systems
Here’s where things get a little more creative. Imagine a small trolley system running along a track on your garage ceiling. The cable is clipped to a moving carriage that slides back and forth. As you drive in, the carriage follows your car. When you park, you pull the cable down to connect.
This is the same system used in industrial workshops, but scaled down for home use. It’s brilliant because it keeps the cable suspended at all times. No floor contact, no dragging, no dust. The only requirement is a clear path from the wall to your car’s charging port.
Installation is a bit more involved—you’ll need to anchor the track into ceiling joists. But if you’re handy with a drill, it’s a weekend project. And the payoff is huge. You just glide the cable into position and plug in. No bending, no coiling.
DIY Cable Wraps and Velcro Straps
Not ready to mount anything? No problem. A simple hook-and-loop strap (Velcro, but the good industrial kind) can work wonders. Wrap it around the middle of the cable when it’s coiled, and hang the whole loop on a heavy-duty hook.
You can also use a cable sleeve—a flexible, braided tube that encases the entire length. This protects against abrasion and makes the cable less likely to kink. It’s a bit of a pain to slide over a thick EV cable, but it’s a one-time effort.
Another trick? Use a bungee cord with a ball. Loop it around the cable and hook it to a wall anchor. It stretches and holds the cable snugly against the wall. Not the prettiest, but it works in a pinch.
Floor-Mounted Cable Guards
Sometimes, you can’t avoid running the cable across the floor. Maybe your charger is on the opposite wall from your car’s port. In that case, a rubber cable ramp or guard is essential. These are those black humps you see in parking lots, but smaller.
They protect the cable from being crushed by car tires and also prevent tripping. You can get them in single-channel or dual-channel versions. If you have a garage with a slight slope, make sure the ramp has a non-slip base.
Honestly, this is a temporary fix. Long-term, you’d want to move the charger or add an extension. But for renters or those who can’t drill into walls, it’s a solid stopgap.
Smart Charger Placement: The Real Solution
Here’s the deal—most cable messes are caused by poor charger placement. If your charger is installed on the wall right behind your car’s rear bumper, you’re always dealing with excess slack. But if you install it on the side wall, near the front or middle of the car, the cable has a shorter, more direct path.
Take a moment to measure the distance from your charger’s location to your car’s charging port. Ideally, you want the cable to reach with only a slight curve, not a full 180-degree wrap. When you’re having a charger installed, ask the electrician about optimal placement. Most will offer suggestions, but they follow code, not your convenience. So speak up.
Also, consider a charger with a detachable cable. Some models, like those with a J1772 or CCS connector, allow you to unplug the cable from the unit. This makes storage much easier—you can keep the cable in a drawer or on a separate hook.
The Coolest Trend: Cable Management Kits
In the last couple of years, several companies have released all-in-one cable management kits. They include a wall dock, a coil hook, and sometimes even a small shelf for the charging brick. These kits are designed specifically for home garages, and they take the guesswork out of mixing and matching parts.
Prices range from $50 to $150. The higher-end ones are made of aluminum or powder-coated steel, which looks great in a modern garage. Some even come with LED status lights that show when charging is active. A little gimmicky, but hey, it’s your space.
If you’re the type who likes everything to match, these kits are worth a look. Just make sure they’re compatible with your charger’s connector size. Tesla’s connector is slimmer than a CCS1, so check the specs.
What About Outdoor or Unheated Garages?
Cold weather makes cables stiff. Like, really stiff. If your garage is uninsulated, a retractable reel might struggle in winter. The spring mechanism can lose tension when the cable becomes rigid. In that case, a wall holster with a wide hook is more forgiving.
Also, moisture is a concern. If your garage gets damp, avoid storing the cable on the floor. Even a small amount of water can seep into a cracked jacket. Always hang the connector upright, so any condensation drips away from the pins.
Let’s Talk About Aesthetics
You know, garages aren’t just for cars anymore. They’re workshops, gyms, man caves. So your cable management should look decent, too. A black cable against a white wall is fine, but a braided fabric sleeve in a gray or orange tone can add a subtle pop of style.
Some folks even paint their wall hooks to match the trim. It’s a tiny detail, but it makes the whole setup feel intentional. And if you’re showing off your EV setup to friends, a clean cable arrangement says “I’ve got my act together.”
Maintenance: The Forgotten Step
Once you’ve got a system in place, don’t just set it and forget it. Every few weeks, wipe down the cable with a damp cloth. Check for cuts, abrasions, or any spots where the outer sheath feels thin. Also, inspect the connector for debris or bent pins.
Lubricate the hinges