E-bike Conversion Kits for Vintage Bicycle Models: Breathe New Life into Your Classic Ride
That old Schwinn leaning against the garage wall. The classic Peugeot you can’t bear to part with. They’re full of character, but maybe not so full of speed on a steep hill. What if you could keep that timeless look but add a modern, electric boost? Well, you can. E-bike conversion kits are the secret weapon for vintage bike lovers.
Honestly, it’s like giving your favorite pair of worn-in jeans a hidden, high-tech pocket. You get the comfort and style you love, but with a whole new level of capability. Let’s dive into how you can transform your mechanical marvel into an electric-powered dream.
Why Convert a Vintage Bike? The Heart of the Matter
Sure, you could buy a brand-new e-bike. But a conversion? It’s a different story. It’s a project. It’s personal. You’re preserving a piece of cycling history, a bike that might have a story. You’re also often getting a frame built from steel—a material known for its smooth, forgiving ride quality that many modern aluminum frames can’t match.
And let’s talk about sustainability. Upcycling your old bike is a far greener choice than manufacturing a completely new one. It’s the ultimate in conscious cycling. That said, it’s not a one-size-fits-all solution. You need to know what you’re getting into.
First Things First: Is Your Vintage Bike a Good Candidate?
Not every classic is a perfect fit. Before you get excited, you need to do a quick health check on your old steed. Think of it like a doctor’s physical before starting a new exercise regimen.
The Frame and Fork
Look for cracks, rust, or any significant damage, especially around the welds and joints. The frame must be structurally sound. The added power and weight of a motor will put new stresses on it.
The Brakes
This is non-negotiable. More power demands more stopping power. If your bike has original steel-rimmed wheels and caliper brakes, beware. They perform terribly in the rain and are inadequate for an e-bike. A common and highly recommended upgrade is to switch to alloy rims and modern brake pads. For ultimate safety, consider a bike with disc brake mounts or, at the very least, high-quality linear-pull (V-brakes).
Wheel Size and Dropouts
Hub motors need to fit into your bike’s fork (front hub) or rear triangle (rear hub). Measure the space between your fork ends and rear dropouts—the standard is 100mm for front and 120mm, 126mm, or 130mm for the rear. Many vintage road bikes have 126mm rear spacing, which can often be carefully persuaded to fit a 130mm hub motor. It’s a bit of a squeeze, but it’s a common fix.
Choosing Your E-bike Conversion Kit: The Three Main Flavors
Alright, here’s the deal. There are three primary types of kits, each with its own pros and cons. Your choice will depend on your bike, your budget, and how you plan to ride.
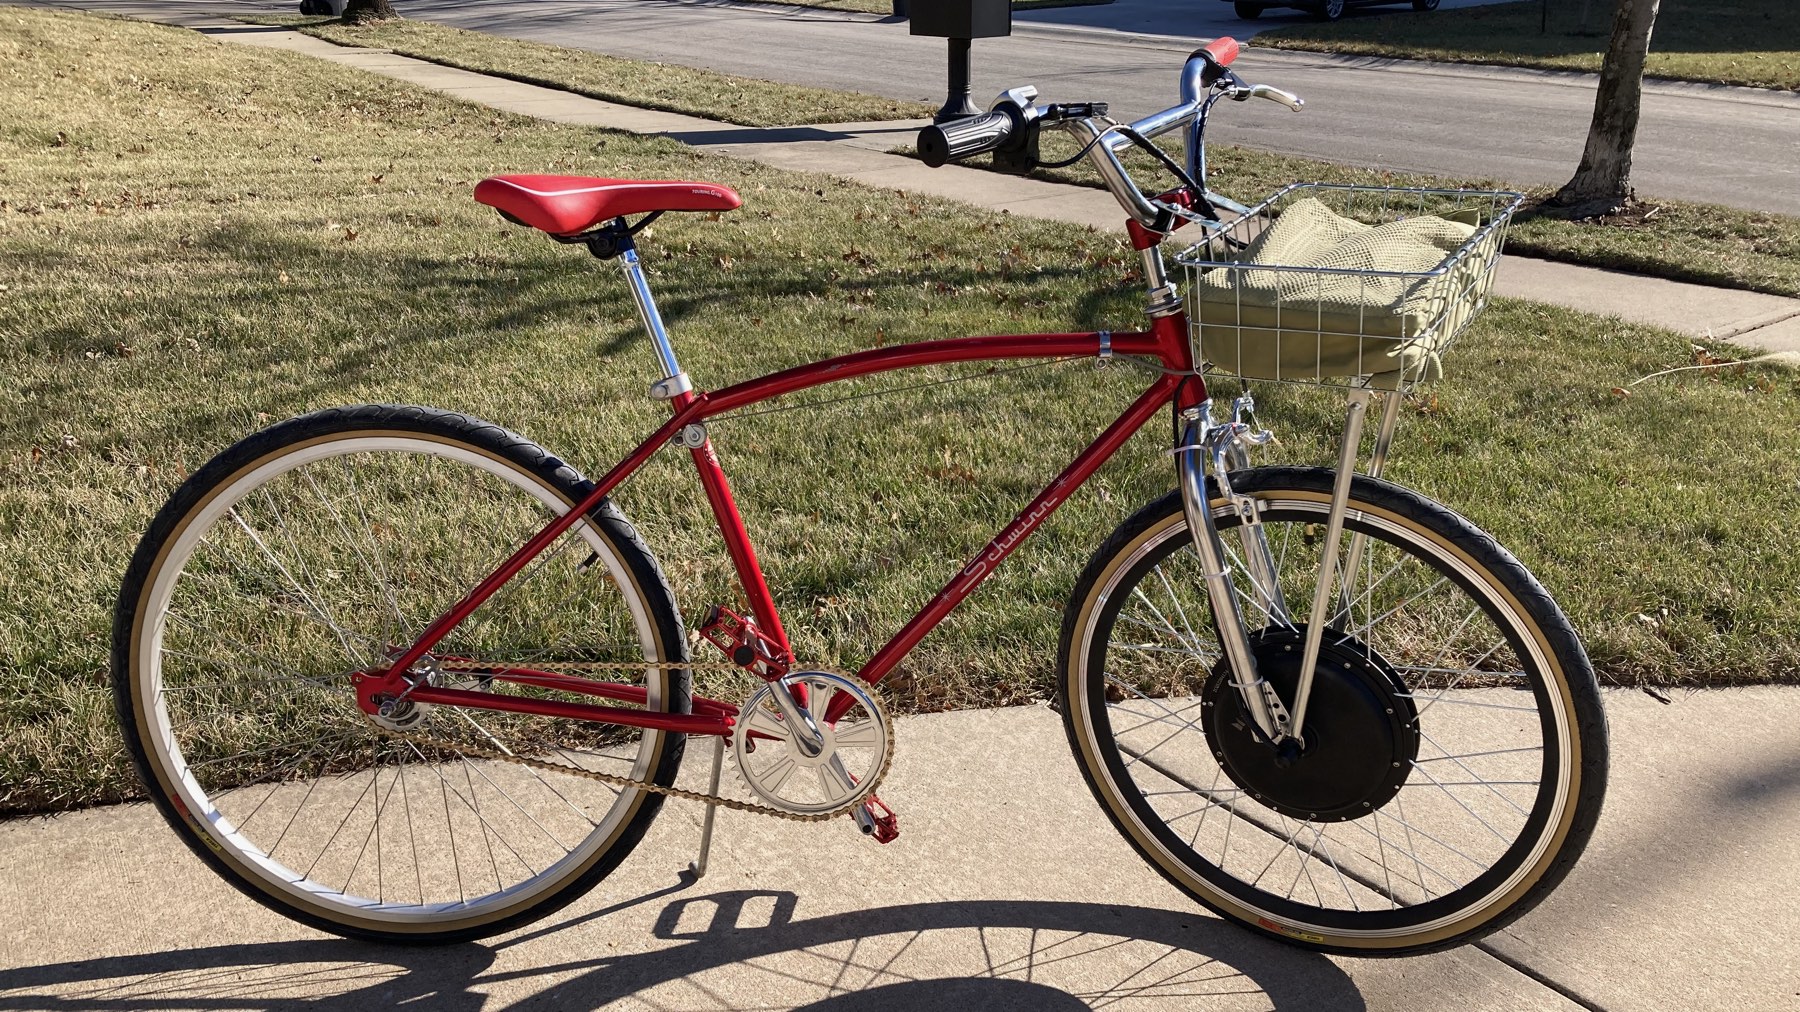
1. Front Hub Motor Kits
These are often considered the easiest to install. You simply replace your existing front wheel with a new one that has a motor built into the hub.
Pros: Installation is relatively straightforward. It keeps your rear gears and drivetrain completely untouched. The sensation is like having a gentle, invisible rope pulling you forward.
Cons: It can make the front end feel heavy. On a vintage fork not designed for that torque, there’s a small but real risk of the wheel loosening if not installed perfectly. Traction on steep, loose hills can be an issue since the weight is shifted away from the powered wheel.
2. Rear Hub Motor Kits
This places the motor in the rear wheel, which provides better traction and a more natural, “pushed” feeling.
Pros: Excellent traction and a balanced ride feel. It’s a very popular and effective setup.
Cons: Installation is trickier. You have to deal with the chain, gears, and often fiddly torque arms. If you have an internally-geared hub or a complex derailleur system, it can get complicated.
3. Mid-Drive Motor Kits
This is the performance option. The motor is located at the bike’s crank and bottom bracket, leveraging your bicycle’s existing gears. This means incredible hill-climbing power and a very centered, natural weight distribution.
Pros: Superior power and efficiency, especially on hills. Feels the most like a “normal” bike, just a super-powered one.
Cons: By far the most complex and expensive to install. It puts significant stress on your vintage bike’s chain and gears, which may wear out faster. Bottom bracket standards on old bikes can be a major compatibility hurdle.
The Installation Lowdown: What to Really Expect
Let’s be real. If you’re moderately handy, a hub motor conversion is a very achievable weekend project. You’ll need some basic tools, plus maybe a few special ones like a crank puller or a bottom bracket tool. A torque wrench is your best friend here—over-tightening on old steel components is a real risk.
The wiring looks intimidating, but it’s usually just a matter of connecting color-coded plugs. The real challenge is routing the cables neatly and securing them with zip ties. You want it to look clean, not like a bowl of electronic spaghetti.
Here’s a quick checklist of the installation process:
- Assess and Prep: Give your bike a full mechanical once-over. Replace worn brake pads and tires. Clean the drivetrain.
- Mount the Wheel: Install the new motorized wheel. This is the critical step where you’ll install torque arms to prevent the motor from spinning loose inside the dropout.
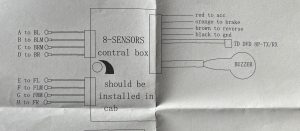
- Install the Battery & Controller: Secure the battery to the frame, usually on the downtube or a rear rack. Mount the small controller box somewhere discreet.
- Connect the Wires: Route and connect all the cables from the motor, throttle, brake sensors (if you have them), and display to the controller.
- Final Checks: Double-check every bolt and connection. Inflate the tires. Do a short, cautious test ride in a safe, open area.
A Quick Comparison: Your Vintage E-bike Kit Options
| Kit Type | Best For | Installation Difficulty | Key Consideration for Vintage Bikes |
| Front Hub | Flat terrains, easy installation, bikes with standard forks | Easy | Must ensure fork dropouts are steel and robust; use a torque arm! |
| Rear Hub | Hilly areas, better traction, a natural ride feel | Moderate | Rear dropout spacing is crucial; may require “cold setting” the frame. |
| Mid-Drive | Serious hill climbing, performance riding, long range | Difficult | Bottom bracket compatibility is the biggest hurdle; stresses the drivetrain. |
The Final Result: A Beautiful, Rolling Contradiction
When it’s all done, what you have is something truly special. A machine that turns heads. The classic, elegant lines of a bygone era, hiding a silent, powerful heart. You get the joy of pedaling a lightweight, responsive frame, but with the freedom to take on any hill, any headwind, any distance without arriving drenched in sweat.
It’s more than just a bike. It’s a statement about preservation and innovation. It’s about honoring the past without being stuck in it. So look at that vintage bicycle in your garage not as a relic, but as a blank canvas. A little bit of history, ready for its next chapter. And you’re the one who gets to write it.